THE BREATH IS ESSENTIAL
Steps of preparing to play, which can be done very quickly, but are important for good habits:
You will have to start with a rougher version of this - fingers might not, for example, be quite where you'd want them the first couple days - but work to ingrain this so that it's automatic. Students will do much of this pretty naturally, so you will not need to explicitly say all of it in one go, but do keep a lookout for it, and address any pieces that aren't consistently setting as they should during the breath (i.e. "balance points, fingers on G, reed on lip, breathe out 2 - breathe through the top lip! - breathe in AND" or "breathe out, breathe in - find the reed with the tongue! - AND"). In some places, the order can be a bit different - it should follow logically enough where (tapping the foot could start anywhere before the breath; the fingers could set before putting the reed on the lower lip).
Steps of preparing to play, which can be done very quickly, but are important for good habits:
- Balance points.
- Get the right thumb and left first finger in position - thumbrest past the joint and right thumb at a natural angle closer to flat to the thumbrest than the oboe, left first finger on the fingertip and curved.
- Bring the oboe to playing position in the balance points
- Fingers close.
- Bring the other fingers close to the keys, curved.
- You can come so close that you are touching metal as long as you don't actually push keys you don't want (you will always be pushing the first key down, with one exception that won't show up for many months).
- Reed on lower lip.
- Set the reed on the lower lip, with just a little reed inside the lip (lower lip should be no further down than where the heart meets the windows, but you need enough that you'll be able to play without drastic rolling).
- The reed should sit where the wet part of the lip meets the dry part of the lip.
- You can push the reed somewhat into the lower lip MUSCLE (NOT lip-covered teeth; the corner muscles must be engaged), using the left first finger to do so.
- To breathe, keep the top lip open and the corners of the mouth firmly forward towards the reed.
- Don't let the corners pull back or smiley.
- Set the fingers for the first note.
- Find that note with your eyes, if reading music.
- Keep the other fingers close to their keys.
- All fingers, down or up, should be curved.
- AVOID tilting the hand up, feeling like you're squeezing the oboe, or generally tensing or straightening fingers at the moment they go down.
- Start tapping the foot.
- Breathe OUT first, then in.
- Always do breathe out first, to get rid of old stale air and prepare to bring new air into the 'belly.'
- Breathe so that the belly expands. Feel the belly button go out.
- Try to keep the belly button pushing out when you play for good core muscle use.
- Avoid shoulder movement.
- Keep the reed anchored firmly on the lower lip and the corners firmly forwards towards the reed during the breath.
- Avoid sucking the lips in with the breath.
- Breathe through the top lip always!!
- Never through the oboe or through the nose.
- Avoid moving the oboe angle or posture/head position during the breath. Many students find this tempting.
- Set the tip of the tongue to the tip of the reed.
- This really happens simultaneously with closing the lips.
- Make sure it's tip of tongue to tip of reed.
- Close the top lip down.
- Keep the corners firmly forward and DOWN.
- Imagine the corners of the lips coming into the corners of the reed like the four corners of a diamond shape.
- Think frowny, NOT smiley, to help get the top lip corners down.
- Move the lip down; try not to duck the head instead at the last moment.
- Most students have little trouble, but some will try to move the head instead of the lip. If they continue to struggle with this, some work on specifically being able to pull the top lip down may help.
- Keep the bottom lip corners firmly engaged as well.
- Keep the corners firmly forward and DOWN.
- Blow and release the tongue.
- Engage the core muscles. Feel the belly button push out.
You will have to start with a rougher version of this - fingers might not, for example, be quite where you'd want them the first couple days - but work to ingrain this so that it's automatic. Students will do much of this pretty naturally, so you will not need to explicitly say all of it in one go, but do keep a lookout for it, and address any pieces that aren't consistently setting as they should during the breath (i.e. "balance points, fingers on G, reed on lip, breathe out 2 - breathe through the top lip! - breathe in AND" or "breathe out, breathe in - find the reed with the tongue! - AND"). In some places, the order can be a bit different - it should follow logically enough where (tapping the foot could start anywhere before the breath; the fingers could set before putting the reed on the lower lip).
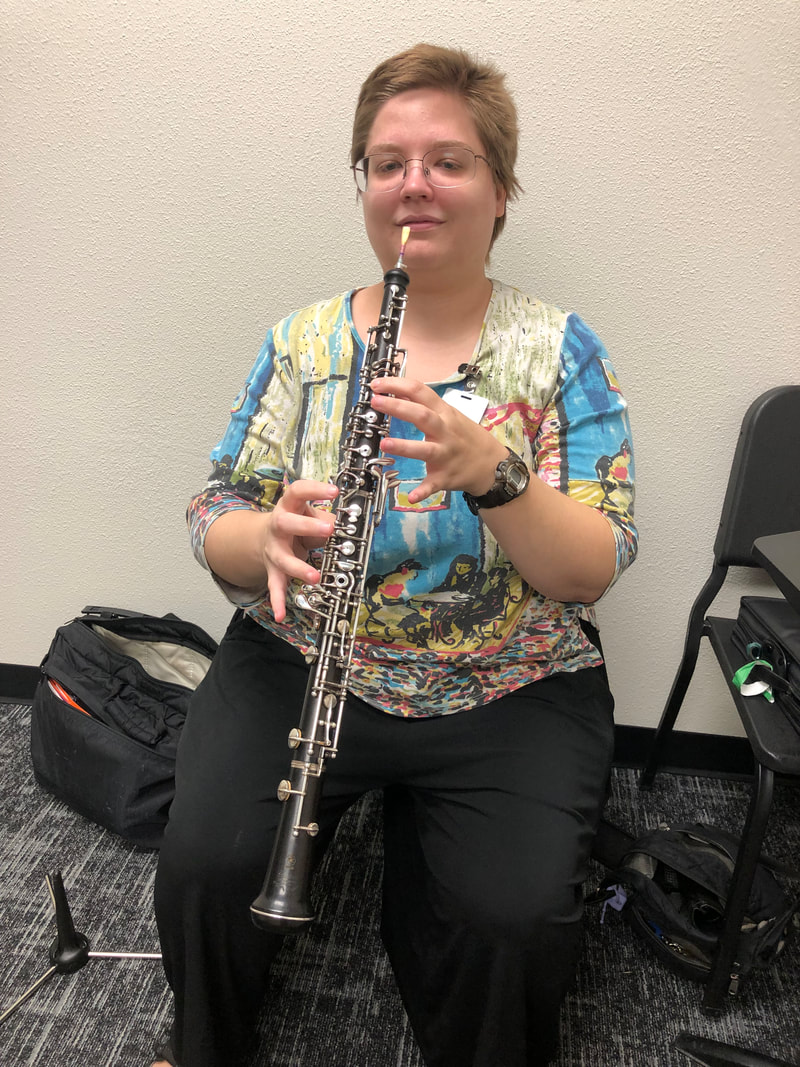
Balance points
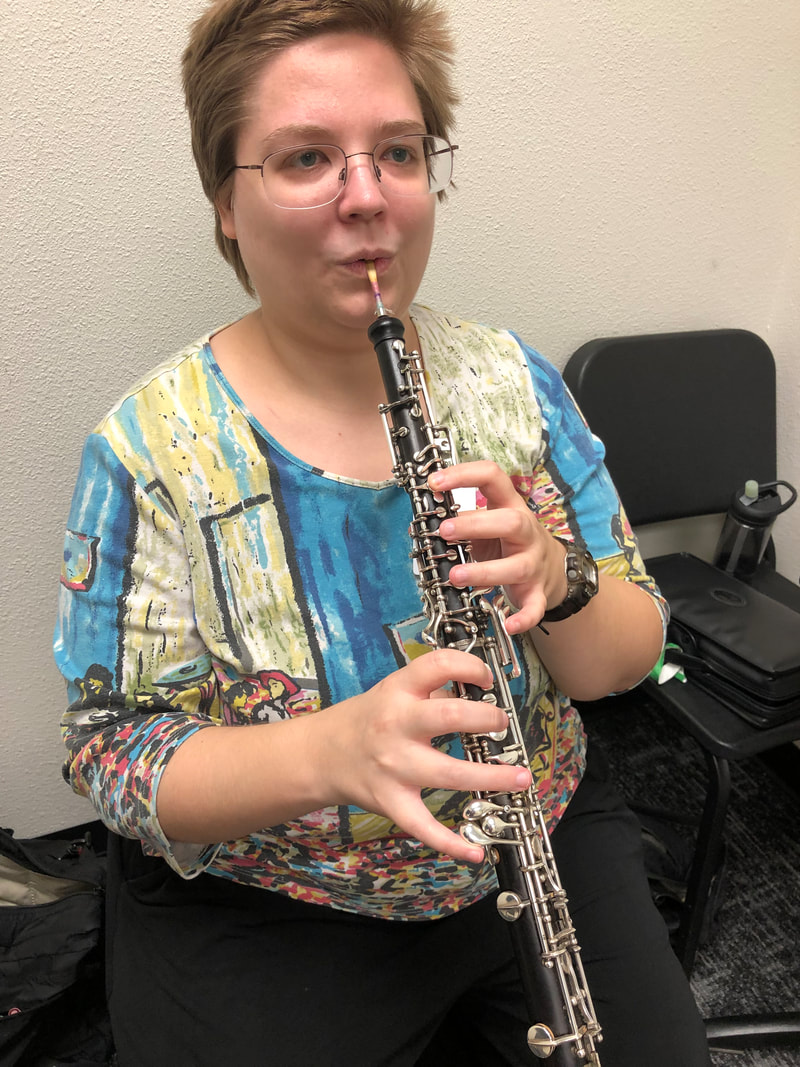
Reed on lower lip
embouchure corners engaged |
Balance points from the back
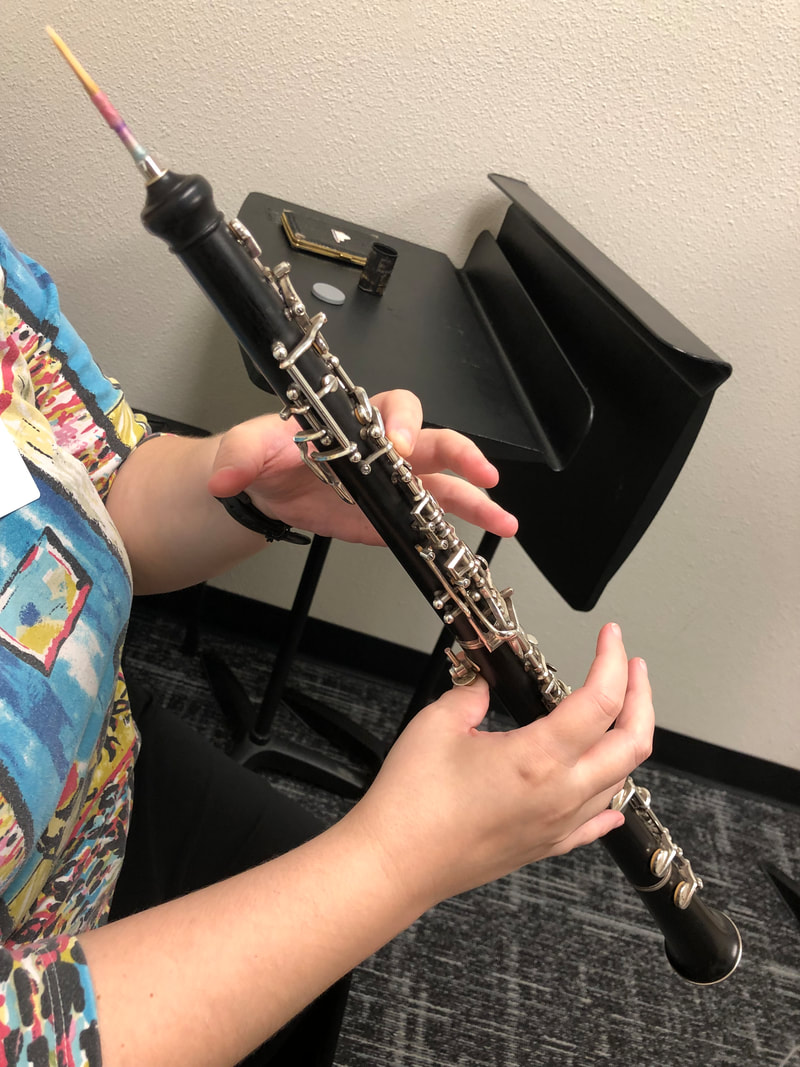
Fingers on first note
Eyes on music Breathe out and in Ready the tongue |
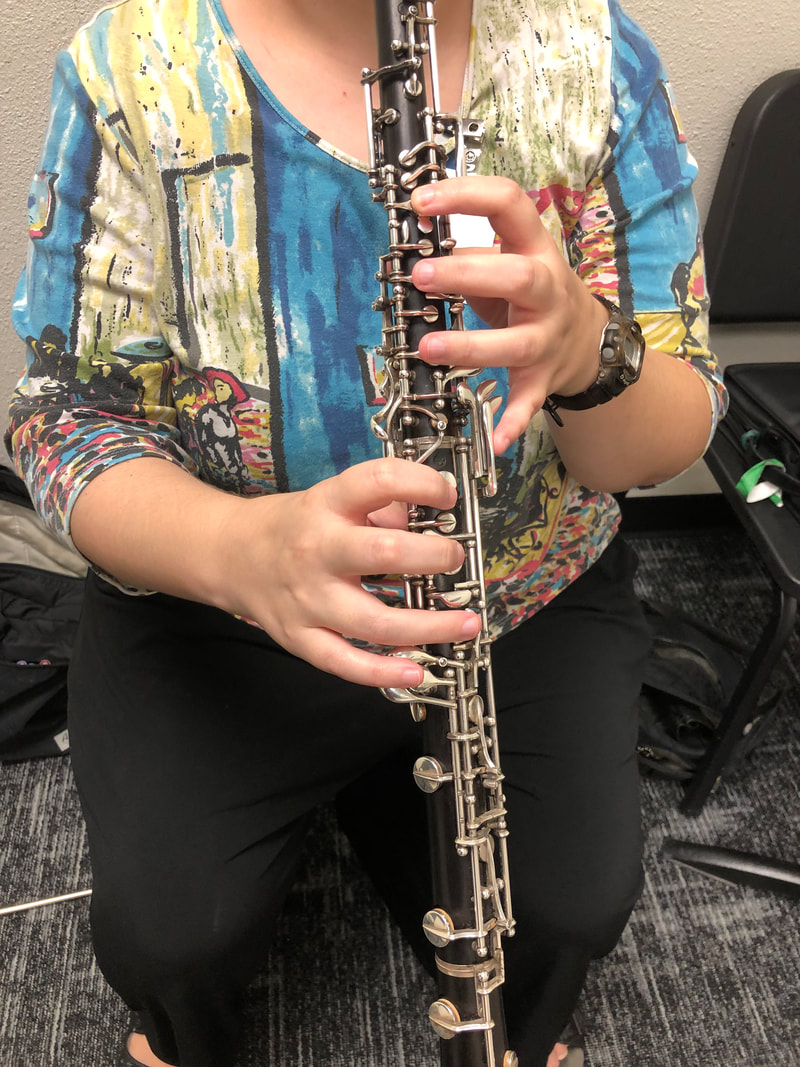
Fingers close
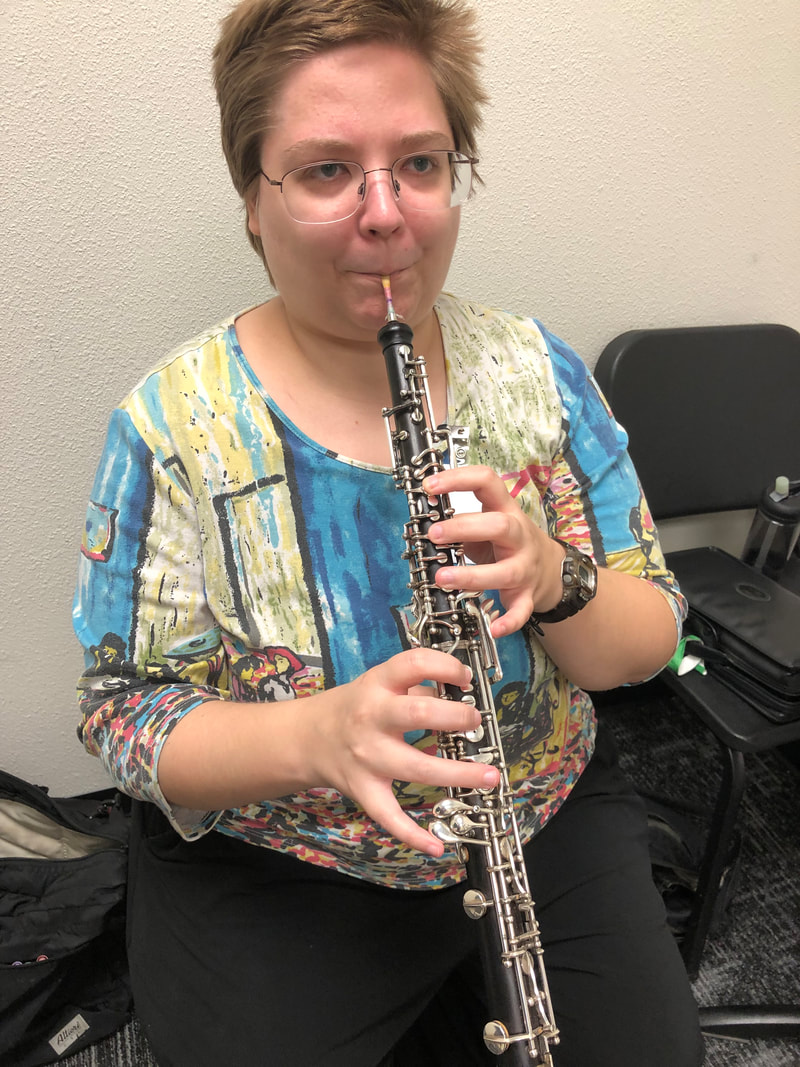
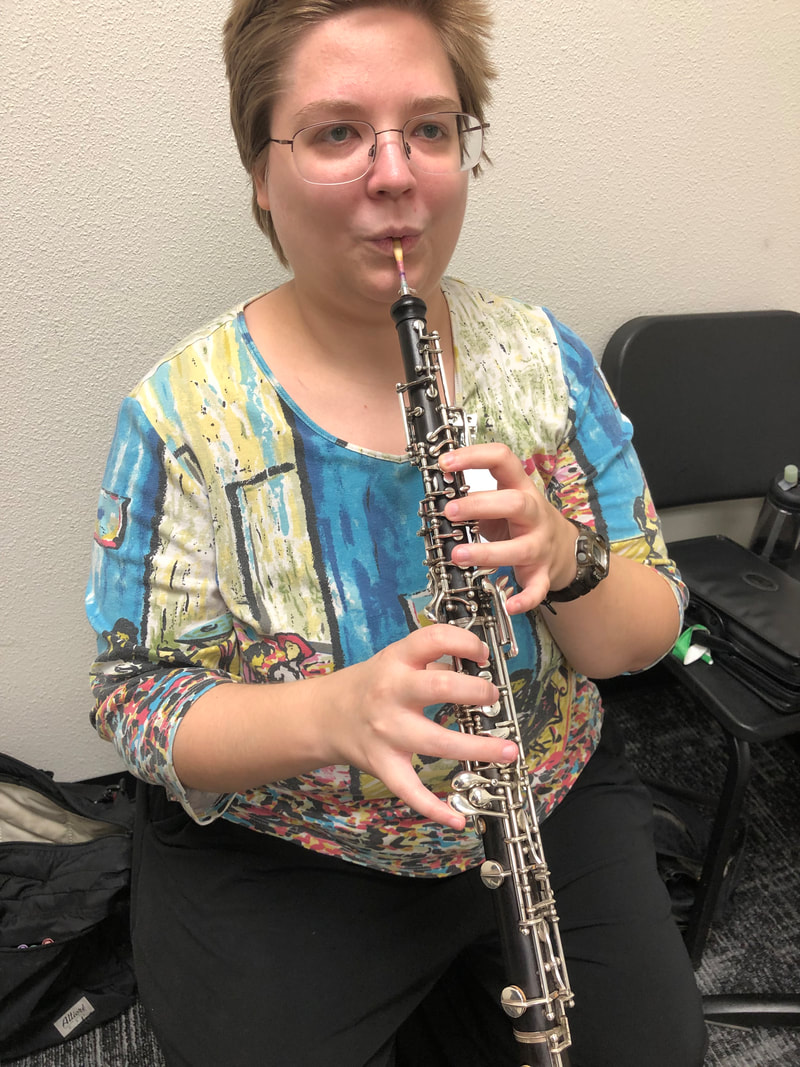
Close the embouchure, keeping the Corners firmly forward
Tongue and play |
