Fundamental Oboe Finger Skills
General things to keep in mind:
Risks for building bad habits:
General things to keep in mind:
- All fingers should curve
- Over-high hand angle causes straight third fingers and pinkies
- Difficulty with the 2nd-3rd finger spread is a major cause of this
- Over-high hand angle causes straight third fingers and pinkies
- Tension is the enemy
- Beware habits that may build from inattentive moments (just holding the oboe, etc.)
- One-handed playing position should be avoided
- Be sure the hands when fingering are in a place similar to when playing. Watch for wrist angle issues.
- When just fingering, the oboe needs to be in a place that allows for similar angles to playing. Fingering on the knee risks altering wrist angles to reach the awkward position.
- Octave key accuracy is essential.
- Fingering inaccuracy can cause pitch, response, and tone issues
- And tempt students to create problems with embouchure to compensate (students who fail to consistently and accurately use half hole pivot and octave key - half hole is the bigger risk - often end up biting to compensate. This will make them sharp and give them great difficulty with low note response forever. If a student struggles more with low Eb's response than low C's, this is certainly why).
- Do finger drills, and do them slurred. Tonguing can hide finger inaccuracy and miscoordination.
- Be sure students can manage a new finger concept several times in a row without losing accuracy or good hand position. If they can only play a combo once or twice without losing control, they don't yet have that skill down.
- Tonguing can hide finger inaccuracy and miscoordination. If students can't drill a finger concept smoothly slurred, they may not have the skill down.
- Learning order MATTERS.
- Some skills build on others
- DON'T introduce several new challenging skills at once and blow through them like they're nothing. Christmas music can be bad about pushing towards this, as can full-band beginner books; both tend to put young oboes in very difficult keys/ranges for fingerings for where they are developmentally.
- While you may have to rush them there, be smart about it. Drill the underlying skills often, starting in a reasonable order.
Risks for building bad habits:
- One-handed playing position.
- Balance points for good hand position require both hands.
- Taking one hand off and staying close to playing position forces changes in the hands that can become habit:
- Tension in general
- Squeezing left thumb
- Hands at too-high angles
- Straight third fingers and pinkies
- Trouble reaching pinky keys
- Fingering with the oboe on the knee instead of near playing position
- Forces the left wrist to a higher-than-natural angle
- Jumping into higher level skills before the underlying ones are built
- Beware of starting half hole Eb - octave left F too early!!!
- Left and right pinky control, half hole pivot, and first octave key use SHOULD BE TRAINED FIRST, and then be careful about adding them in combination
- Beware of starting half hole Eb - octave left F too early!!!
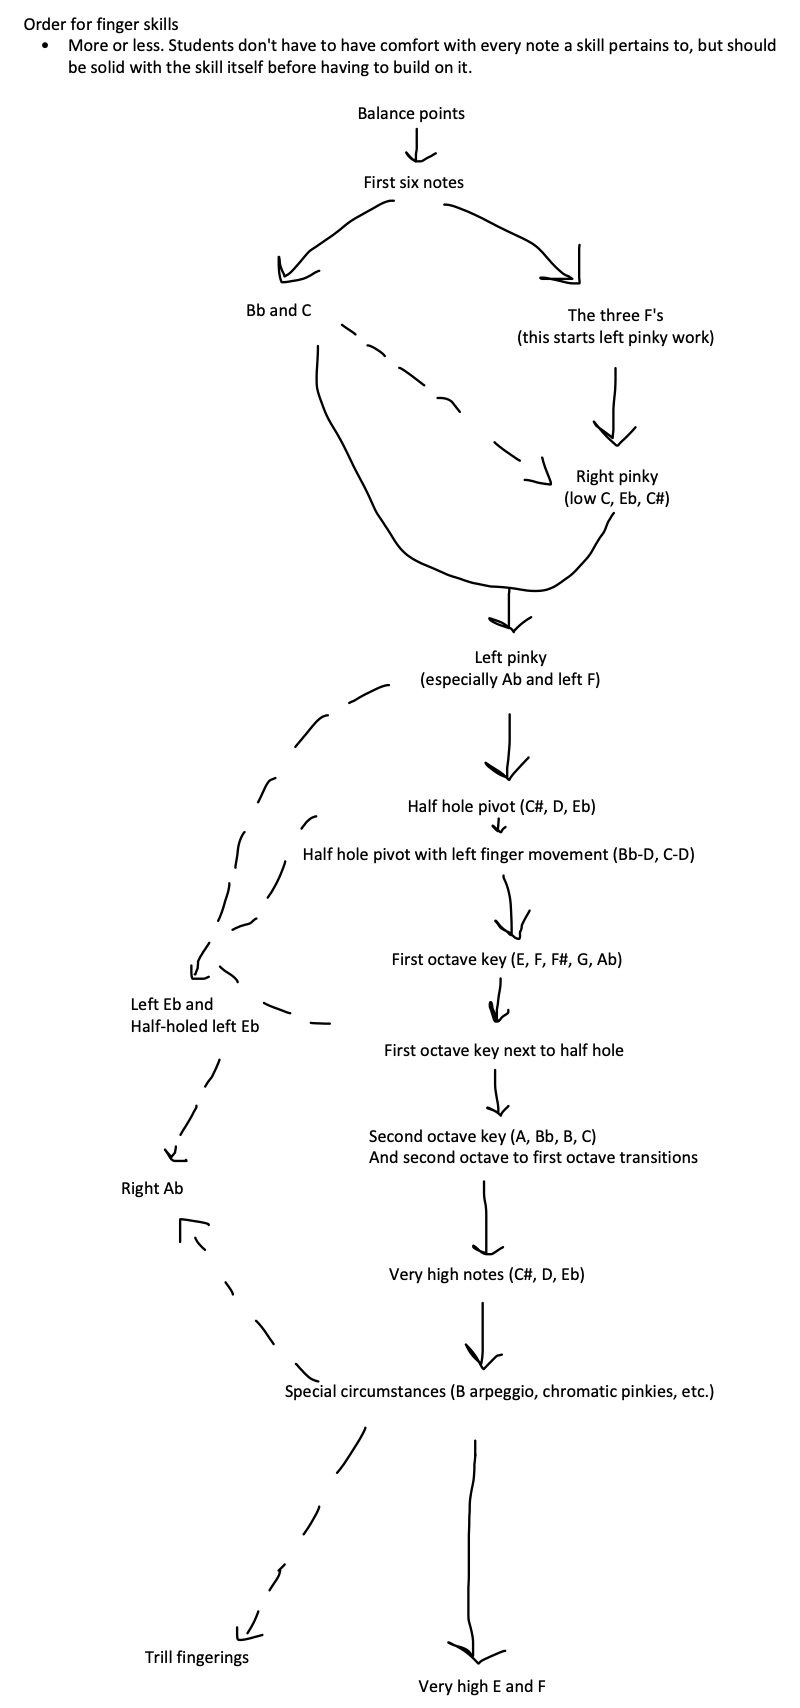
Beginning:
Balance points: RIGHT thumb and LEFT first finger
Main six fingers:
Bb and C
The three F's
Right pinky keys - low C, C#, Eb
Left pinky keys - Ab, left F, left Eb, low B, low Bb
Half hole - D, Eb, C#
Half hole pivot WHILE also moving left hand fingers is an additional challenge.
First octave key - E, F, F#, G, Ab
Second octave key - A, Bb, B, C,
and transitions from first to second octave key
Very high notes - C#, D, Eb
Right Ab
Special circumstances - chromatic pinkies, banana key, alternate low B and Bb, B arpeggio, pinky pair
High school level high notes - E and F
Trill fingerings
Balance points: RIGHT thumb and LEFT first finger
- Right thumb with the thumbrest past the last joint, between the joint and the thumbrest
- Right thumb at a natural angle - will vary by student, but generally closer to flat to the oboe than flat to the thumbrest. Should be same angle their thumb is at in a C shape without the oboe.
- This keeps the fingers lower, near the pinky keys, so things will be easier to reach. An incorrect thumb angle puts the fingers too high, and then students end up cramping up the hand to get them down.
- The first finger may need to reach up a bit at this angle. This is GOOD. It also can be a bit low; modern oboes have an attachment to the F# key to allow for that. But it should not be tilted up; that pulls the force away from the fingertip and key.
- Avoid squeezing with the left thumb.
- Balance points take both hands. To avoid building bad habits here, go to a sufficiently different 'holding position' when you take one hand off the oboe and lose the balance points.
Main six fingers:
- Fingertips cover the holes
- There will be holes on every key except F#. That finger can be lower.
- Fingers should be curved
- Including third fingers and pinkies
- Biggest challenge will be the spread between the second and third fingers on each hand.
- It's larger than other instruments
- Students may try to tilt their hands up to reduce the distance, but this should be AVOIDED, especially in those with smaller hands, as it makes it much harder to reach all the pinky keys and to keep third fingers and pinkies curved.
- Try Spock hands and waving Spock hands to practice the spread
- Pinkies hover above pinky keys
- Left thumb may either gently touch the oboe under the octave key or float nearby
- Avoid either squeezing with it or letting it fly far away
- Look for a mostly straight, relaxed line from the elbows to the middle of the hands.
- Especially in the left hand.
- Elbow angle needs to be in a place to allow this.
- Drills:
- D - E - F# - G - A - B and vice versa to get used to moving individual fingers, and to the concept of adding fingers to go lower and raising them to go higher. Never pick up the first finger; it's a balance point.
- |: F#-D :| can be particularly difficult because students often struggle with control of the F# finger, especially if their right hand is angled too high
- |: A-F# :| to help students begin to combine right and left hand movements
Bb and C
- These depend on the bridge key that moves with the F# key being exactly aligned.
- The fourth finger, via that bridge key, lifts keys on the top joint, which is why Bb is higher than A and C is higher than B.
- This creates cross fingerings.
- Drill |: C-A :|
- Drill |: Bb-G :|
- Consider mixing some F#'s into those drills for added challenge - sometimes that fourth finger lifts, sometimes it stays.
- This is the first time students, in an ideal pedagogical sequence, will have added a finger to RAISE the pitch, rather than lower it.
- Drill |: A-Bb-B-C :|. It's in chromatic patterns, and it's highly counterintuitive
The three F's
- Rule for choosing: No sliding allowed
- Right F: Default option
- E and F fingers will be CLOSE, unlike on D.
- Practice |:D-E-F-E:| to train finger to know both keys' locations well.
- CAN'T be used next to D, Eb, or other notes requiring the D key. NEVER allow students to slide from the right F key to the D key or vice versa.
- Because it keeps the moving fingers in most situations on the same hand, this is the more ergonomic option. Students used to band keys sometimes forget this fingering should be their default F fingering.
- Left F (if your oboes have it; some student oboes don't): Second choice.
- Use when F is next to a note that requires the D key (D, Eb, Db, low C)
- Sounds exactly like right F
- The left hand's angle must always be low enough to allow the pinky to hit this key without tilting the hand.
- Drill |: left F - low D :|, |: left F - low Eb :|, etc. The pinky CAN'T be left down on other notes.
- Some students want to use forked F rather than left when starting because the pinky is a bit of a challenge at first. Don't allow this; its tone is significantly different.
- Forked F
- Use when either of the other F fingerings would require sliding (next to left Eb, low B or Bb, between Eb and Ab, etc.)
- Students without left F will need to use this much more often.
- Has a different tone and slightly different pitch than left or right F. Often fuzzy.
- NEVER ADD A PINKY KEY
- It makes the note sharp. Other F fingerings run just a hair low.
- Students will have to unlearn this when they have a forked F resonance key, which they almost certainly eventually will. I don't think it's advisable even without forked F resonance.
- It makes several of the situations forked F is needed for impossible.
- Right F: Default option
- Make students write in F fingerings (1 letter each - R, L, F/X/Y) on their music. They usually won't do it without being told.
- Know and tell students which to use in each scale.
- Right F scales: C, F
- Left F scales: Bb, Eb
- Forked F scales: Ab, Db, Gb
Right pinky keys - low C, C#, Eb
- Keep the pinky curved and on the fingertip
- Less curved for Eb than C, but still slightly curved.
- Except when playing low C next to low C#, which is a more advanced move.
- Move the pinky independently, without moving the whole hand. The hand should always be at a low enough angle that the pinky can reach all three keys.
- Drill combos for muscle memory of key locations and pinky independence (if the D finger moves with the pinky, they'll squeak on low C or C#)
- |:C-D-Eb-D:|, |:C-D-C#-D:|, etc.
- NEVER slide from the Db key to the Eb key or vice versa. For now, avoid sliding entirely. C-C# is a special case to deal with later.
Left pinky keys - Ab, left F, left Eb, low B, low Bb
- It's important to move the pinky independently
- Avoid tilting the hand up when hitting Ab. On Ab, the pinky will be very curved and very close to the G finger. Tilting the hand up instead often causes students to slip off keys.
- Excessive straightness in the pinky and/or G finger can contribute to this tendency.
- And discomfort with the spread from A-G can contribute to that straightness.
- Excessive straightness in the pinky and/or G finger can contribute to this tendency.
- Avoid raising the lower part of the hand above the oboe to hit the keys
- Avoid tilting the hand up when hitting Ab. On Ab, the pinky will be very curved and very close to the G finger. Tilting the hand up instead often causes students to slip off keys.
- Keep the pinky curved - some keys (Ab, low Bb, low B) will need more curve than others, but all should have a little
- The keys are levers - if you hit Ab, B, or Bb too near the fulcrum/center, they may not close effectively or may take too much pressure
- Drills:
- |: Left F - G - Ab- G :|
- |: Left Eb - low C :| and |: Left Eb - low Db :|
- |: Left Eb - G - Ab- G :|
- Don't slide from the left F pinky to left Eb or Ab; that's what forked F is for.
- On left Eb, it is particularly important to keep the G finger on the fingertip, curved, and centered on its hole. Most squeaks on left Eb are caused by leaks from the G finger.
- Occasionally, they're instead caused by a leak in the A finger
- On some oboes, the Ab trill adjustment being too loose can cause a squeak if students press left Eb very hard. It's usually the G finger, though.
Half hole - D, Eb, C#
- This is one of the most important, most challenging, and most underestimated fundamentals of oboe
- Notice that this is the octave mechanism used when the D finger is down.
- I recommend a pivot.
- Knuckle leads
- Practice the pivot:
- On the arm (students can do this with no oboe throughout the day to build this physical skill)
- On the balance points on the oboe, being sure to move only the first finger
- Fingering |: low D - half hole D :|
- Playing |: low D - half hole D :|
- Things to watch for:
- Move the finger only, not the hand or wrist, not other fingers. However, know that the finger does continue into the hand somewhat - imagine a skeleton glove, and you'll know what you should be moving
- The KNUCKLE LEADS this motion. The big knuckle on top, not the one next to the fingertip. This is extremely important; mapping this to the fingertip instead tends to create tension and sliding.
- The knuckle leads closing as well as opening. Closing should be as crisp as opening.
- It should feel like the knuckle is under the fingertip for the entirety of half holed notes.
- Feel the knuckle go down to open and up to close.
- Make big gestures to help your students focus on moving the knuckle
- Help struggling students by moving the knuckle for them a couple times
- Bumping the knuckle lightly can help struggling students
- Keep the left thumb and the webbing between the left thumb and first finger RELAXED. A muscle there is involved in moving the half hole, and tension can prevent its working. Students in the habit of squeezing the oboe with their left thumbs or turning their thumbs to an unnatural angle may struggle with half hole.
- NEVER let the finger pick up off the key entirely. Often students who slide instead of pivot end up doing this to close, as it's far easier to slide down than up, and they often slide low enough that they can't really get back up without picking up the finger. Picking up the finger will add extra notes between.
- The half hole must be consistent in quality and accuracy. Keep an eye on it.
- Students who fail to adequately and consistently open the half hole often start to bite instead. They will struggle particularly to play low Eb.
- Students who fail to adequately and consistently close the half hole often sound hissy and/or sharp on mid range notes and on first octave notes, and may squeak badly on G and Ab.
Half hole pivot WHILE also moving left hand fingers is an additional challenge.
- Drill the left hand portion of this skill before adding the right hand and before playing it.
- Like this for A-D:
- Finger A, open and close the half hole
- Continue, but when you open the half hole, add the G finger, and when you close the half hole, remove it.
- Finger |: A-D :|
- Play |: A-D :|
- Like this for A-D:
- Drills:
- Start with |: A-D :| and |: Bb-D :|
- Then |: B-D :| and |: C-D :|, which involves moving two fingers, not just one, in coordination with the half hole.
- Drill |: low left F - D :| LOTS. The pinky coordination is surprisingly difficult, and you'll need this skill very solid if they're to play well in the most common band keys.
- Left Eb is also a unique challenge here
- At some point before hitting the scales with half holed left Eb, drill:
- |: low left Eb - half holed left Eb :|
- |: low forked F - half holed left Eb :|
- Once students are comfortable with the first octave key, then |: octave forked F - half holed left Eb :|
- At some point before hitting the scales with half holed left Eb, drill:
First octave key - E, F, F#, G, Ab
- Note that the first octave key is used when the D finger is NOT down but the G finger IS, with the exception of forked F
- Octave transitions on the oboe map with the third finger of each hand, keys 3 and 6 on the instrument.
- Avoid turning the thumb or collapsing at the knuckle when hitting this key, as that can cause tension that can interfere with the half hole pivot. Use the side of the thumb that naturally faces the oboe.
- Remember that you can float the thumb near the oboe. Move it in a relaxed way.
- Don't tense the thumb trying to have it on the oboe immediately before or after first octave notes
- Pick the thumb up to get to the first octave key, don't rock it; rocking the thumb collapses knuckles and causes tension that will interfere with the half hole.
- Students should aim for the bottom of the first octave key, to avoid accidentally hitting the third octave key instead in the future when they have one.
- Drills:
- |: low E - first octave E :|, same for other first octave notes, especially Ab
- |: low E - half hole D :|, then |: first octave E - half hole D :|
- |: low left F - half hole D :|, then |: first octave left F - half hole D :|
- |: low left F - half hole Eb :|, then |: first octave left F - half hole Eb :|
- Air and embouchure concerns with first octave notes:
- Students with slow air may struggle to get these notes out even if the fingering is right.
- Do check that the octave key is lifting correctly if students are struggling more than normal.
- This is a good time to check in on students' breathing so the belly button moves out and supporting so that it stays out.
- Avoid biting to compensate for this!
- Instead of biting:
- Use faster, stronger air!
- Aim the air high. Tell students to aim their air at the top of the wall in front of them like they're trying to knock it onto someone who's been annoying them.
- Raise the back of the tongue.
- Like putting the thumb on a hose, this speeds up the air and aims it higher.
- Don't pull the lips back, though! Think 'eee' with the tongue and 'ooo' with the lips.
- Keep the head up and the oboe down, to keep the air aimed high and moving fast
- After working on the air things, try pushing the reed more into the lower lip MUSCLE (corners must be activated so that it's muscle, not lip-covered teeth that you're pushing into).
- Use faster, stronger air!
- Students with slow air may struggle to get these notes out even if the fingering is right.
Second octave key - A, Bb, B, C,
and transitions from first to second octave key
- Notice that the second octave key is used on notes without the G finger
- You can keep the thumb on first octave keys or not - the oboe closes the first octave vent automatically when the second octave key is down.
- I recommend practicing both ways. There will be times when it's more efficient to leave the thumb down, and other times when it's absolutely necessary to move it.
- The reverse is NOT true. The second octave key can ONLY be on second octave notes.
- I recommend dropping the wrist and forearm to hit the second octave key.
- Avoid tilting the hand upwards instead, as that can interfere with students' staying on the half hole and keeping the pinky in good position
- The second octave key goes lower than many students imagine on most models of oboe; it is highly unlikely a student will be unable to reach it this way.
- Always keep the hand low enough to easily be able to reach the left F pinky key
- Drills:
- |: low A - high A :|
- |: low G - high A :|
- |: high G - high A :|, first moving the first octave key off on the A's, then keeping the first octave key the whole time.
- |: high G# - high A :|, first moving the first octave key off on the A's, then keeping the first octave key the whole time. Be sure to use only the first octave key on high G#/Ab.
- |: high Ab - high Bb :|, first moving the first octave key off on the Bb's, then keeping the first octave key the whole time.
Very high notes - C#, D, Eb
- None of these notes have any octave keys!
- After high C, the oboe's fingerings become far less logical.
- C# and D are based on the fingerings a 12th down, F# and G
- High C# (2 3 4 C-pinky) is like low F#, plus the C pinky and minus the first finger
- High D (hh 2 3 C-pinky) is like low G, plus the C pinky, half holed
- Some add E key to this fingering. As the C key, if the oboe is in adjustment, already pushes the E key down, adding the finger only closes a tiny hole and lowers the pitch a miniscule amount. Given how small the change is and how much more awkward that addition makes the fingering in the situations in which it tends to appear, I personally only recommend adding that key in special circumstances, such as long notes with particularly challenging ensemble tuning demands.
- Drills:
- |: high C# - high D :|
- |: high B - high C# :| (be sure to remove the thumb on the high C#!)
- |: high C - high Db :|
- |: high C - high D :|
- High Eb is stranger (hh 2 3 B-pinky 5 6)
- Be sure to use the B pinky! Particularly avoid missing high and getting Ab - that difference will make you about a quarter tone sharp. The Bb key makes you a hair flat, but not by nearly as much; it would be better to miss too low than too high
- Drills:
- |: high Eb - high D :|
- |: high Eb - high Db :|
- |: high Bb - high Eb :| (no thumb on high Eb! For this drill, it's also better not to have it on the Bb)
- C# and D are based on the fingerings a 12th down, F# and G
- All of these notes need exceptionally fast air to jump up the partial, but Eb most of all.
- Keep the head up
- Raise the back of the tongue
- Aim the air high
Right Ab
- This is used very rarely, but is helpful if you have an Ab next to a left Eb, and absolutely necessary if you have an Ab next to a low B or Bb or a very high Eb
- This key will also come in handy on high-school level high notes - E and F
- This is the long key on the right side of the oboe
- Turn the hand to hit the key with the side of the finger
- Keep the fingertip pointed at the F# key
- But the F# key and right Ab key cannot be down at the same time
- Keep the fingertip pointed at the F# key
- Do not hit the hook, if you have one, but the bigger key. The hook is for G#-A trills.
Special circumstances - chromatic pinkies, banana key, alternate low B and Bb, B arpeggio, pinky pair
- Sometimes we must break the rules of good hand position because nothing reasonable is possible, especially in the lowest four notes in the chromatic scale.
- Low C-C#
- There is more than one way to do this, but I recommend hitting the C# key with the tip of the pinky, and the C key with the knuckle, straightening the pinky.
- You can still be hitting the C key on C#; that's okay.
- When going from C-C#, think 'bad pinky, good pinky'
- Avoid moving the D finger when you move the pinky. Focus on this when drilling C-C#.
- Low Bb-B
- For this combo, I recommend hitting the Bb with the pinky hitting both the Bb and B keys, with the pinky at a low angle, and then tilting the pinky up to get off the Bb key for B.
- When going from Bb-B, think '2 pinkies, 1 pinky'
- Be sure the pinky is VERY curved so that you don't pull the G finger off its hole. Focus on this as you drill this.
- If you're about to also have to play C-C#, as in the chromatic scale, set the right pinky in 'bad pinky' position
- Banana key
- In some situations where you have low C next to low C#, especially in the case of a trill, you can use the banana key
- The banana key is next to the low D key, and pushes down the C key without needing the pinky
- You must straighten the D finger to hit the banana key while still covering the hole for the D key
- You should keep the banana key down on C#. You can also keep it down on low Bb and low B if those notes are nearby
- Be careful not to let the D finger come off the hole when moving the C# pinky. Drill banana-low-C - C#, watching out for this
- Some oboes don't have a banana key
- You CAN'T keep the banana key down on D or forked F, which may keep you from using this key in some situations
- Alternate low Bb and low B
- If you have an oboe with an articulated C# AND it's correctly in adjustment, you can play low Bb and low B with the C# key instead of the C key.
- This will be needed in the B scale, or in a Bb minor arpeggio
- The adjustment screw is near the bottom of the lower joint, on the key that moves when you hit the C# key. You don't want it too tight, lest it prevent the C key from closing fully, but you have the screw there and the key isn't fully closed when playing low Bb or B with the C# key, you can tighten that screw in tiny degrees until the problem is solved
- Do make sure you're fully hitting the Bb or B key, though, with a curved pinky. If the left pinky isn't getting its key fully down, the adjustment screw may seem too loose when it really isn't.
- If you have an oboe with an articulated C# AND it's correctly in adjustment, you can play low Bb and low B with the C# key instead of the C key.
- B arpeggio
- The higher octave of this is fine, for the lower octave presents a problem. Low B requires both pinkies to be on pinky keys other than D#. There are 3-4 ways to deal with this problem (whichever you choose, you will need to drill low B-low D# to clean it up):
- Banana key
- You can use the banana key on the low B to free up the right pinky for D#
- The D# key will force the banana key up, but don't actively try to pick it up or you will struggle to get it back cleanly in time
- Be sure to coordinate the B pinky correctly; don't try to keep it on D#
- This method will also work for low Bb-Eb
- Weird left pinky
- Put the tip of the pinky on the left D# key, but drop the wrist/hand so that you can feel the B pinky under the second knuckle
- Drop the wrist even more to move the force to the B pinky with the knuckle, but don't try to straighten the pinky - the tip can stay ready on left D#
- Think of this like laying across a seesaw and shifting the weight to move it
- Be sure to coordinate the C pinky correctly with this
- Be careful not to let the G finger slide off its hole. Keep it curved and the fingertip where it needs to be.
- This method also works for low Bb, if you just tilt the hand a little lower towards the bell
- Put the tip of the pinky on the left D# key, but drop the wrist/hand so that you can feel the B pinky under the second knuckle
- Poky left pinky
- Push the tip of the left pinky into the gap between the B pinky key and the left Eb pinky key. Some flesh will make it into the gap; this may be mildly uncomfortable.
- Push in for D#, out for B
- Think of this like sitting in the middle of a seesaw and shifting your weight back and forth to move it
- Be sure to coordinate the C pinky correctly
- Be careful to keep the G fingertip centered on its hole when moving the pinky
- Push the tip of the left pinky into the gap between the B pinky key and the left Eb pinky key. Some flesh will make it into the gap; this may be mildly uncomfortable.
- Sliding the right pinky between C# (for alternate low B) and D#
- This is not a method I prefer, as I do not find that I can usually do it repeatedly without arm tension
- It helps to go in before going up or down; the keys are closer together inwards
- Nose grease helps. Slide the pinky along the side of the nose to grease it up.
- Banana key
- The higher octave of this is fine, for the lower octave presents a problem. Low B requires both pinkies to be on pinky keys other than D#. There are 3-4 ways to deal with this problem (whichever you choose, you will need to drill low B-low D# to clean it up):
- Pinky pair
- You can hit the Ab key and the left Eb key at the same time with the left pinky
- Aim IN. Note that the Ab key sits lower than the left Eb key, so you'll need to aim at the inside part of the Ab key just so that a small piece of the edge of your pinky is touching left Eb
- Be careful that the G finger stays centered on its hole. A, too.
- If the F#-G# trill is in adjustment, this can be used for Eb next to Ab instead of having to use right Ab
- This will be necessary on very high E and F
- You can hit the Ab key and the left Eb key at the same time with the left pinky
High school level high notes - E and F
- I recommend saving these notes for a while
- Introducing them in late seventh grade with capable students who have demonstrated ability with everything up to this makes sense, but students won't typically need these notes for etudes or reasonable repertoire until high school.
- The full fingerings are awkward, and students who aren't ready may struggle with them
- Learning these fingerings sometimes also causes them to forget the high Eb fingering.
- While short fingerings exist, I wouldn't learn them first.
- Some people can hear the difference between short and full fingerings in tone and pitch
- It's MUCH harder to go from a shortcut fingering to a full one than it is to learn the full one first
- Standard high E and F
- Standard high E: 3rd octave, hh 2 3 Ab/leftEb 5 6
- If you don't have the third octave, you can use the first octave key instead
- Note that the Ab and left Eb keys are hit with the same left pinky
- Standard high F: 3rd octave, hh 2 Ab/leftEb 5 6
- Note that this is exactly like high E, minus the G key
- You can use the first octave key if you don't have the third
- The standard fingering involves the Ab/left Eb pinky pair skill - see notes on pinky pair above
- Do NOT try to make this easier by using both regular/left Ab and regular/right Eb
- In any normal situation - next to high Db, D, Eb, etc. - that fingering does NOT work. There's no point in getting students' hopes up by starting with an easy but unusable fingering
- Drills:
- |: High E - high F :|
- |: High E - high D :|
- |: High D - high E - high F - high E:|
- |: High C - high D - high E - high F - high E - high D:|
- |: High E - high B :| with NO thumb on the high B (second octave only)
- |: High F - high C :| with NO thumb on the high c (second octave only)
- Standard high E: 3rd octave, hh 2 3 Ab/leftEb 5 6
- Alternate high E and F
- Alternate high E: 3rd octave, hh 2 3 right Ab, low B 5 6
- Note that this is high Eb/D# plus the right Ab key and the third octave key
- Alternate high F: 3rd octave, hh 2 right Ab, low B 5 6
- Note that this is the same as alternate high E, minus the G finger
- Use these fingerings next to high Eb
- These are rarer fingerings, but they work very well. and I think they should be the second choice for high E and F fingerings
- They're just a hair flatter than the standard and right fingerings, but they can be used BOTH next to high Eb and next to high D or C#, meaning they're available in almost any situation
- These do work noticeably better with the third octave key, not the first
- Drills:
- |: alternate high E - high D# :|
- |: alternate high E - alternate high F :|
- |: High C# - high D# - alternate high E - high D#:|
- |: alternate high F - high Eb :|
- Alternate high E: 3rd octave, hh 2 3 right Ab, low B 5 6
- Right high E and F
- Right high E: 3rd octave, hh 2 3 side Ab 5 6 right Eb
- Note that this puts the Ab and Eb of the regular high E fingering into the right hand - side for Ab, pinky for Eb
- Alternate high F: 3rd octave, hh 2 side Ab 5 6 right Eb
- Note that this is the same as right high E, minus the G finger
- These fingerings can be used next to high Eb, but NOT next to high D, which can limit their usefulness
- You can still use the first octave key if you don't have a third octave key
- Right high E: 3rd octave, hh 2 3 side Ab 5 6 right Eb
- Short high E and F
- Short high E: 3rd octave, hh 2 3 Ab
- Note that this is like the regular fingering, minus the right hand and the Eb key
- Short high F: 3rd octave, hh 2 Ab
- Note that this is the same as short high E, minus the G finger
- These fingerings are very slightly less in tune and focused in tone than the longer fingerings
- These fingerings do need the third octave key
- You can use either regular Ab or right side Ab, depending on what's nearby)
- Short high E: 3rd octave, hh 2 3 Ab
- The bad short high E
- 3rd octave, hh 2
- This is terribly out of tune, and I see no good reason to use it
- Either the alternate fingering or the better above short fingering (3rd octave, hh 2 3 Ab) will ALWAYS work, and sound far better than this one
Trill fingerings
- There is always a one-finger-moving way to do a trill on oboe
- Except possibly the D above the staff to the E-natural above the staff, or low Bb-B
- Use a trill fingering chart to look up trill fingerings
- Generally, use the octave mechanism of the lower note of the trill
- A middle D-E trill will be half holed the entire time
- The keys we haven't yet covered are trill keys
- The long thin key just above the E key is the D trill key
- If you have two small triller keys on the top joint, the higher is an alternative D trill key
- The lower of the two trill keys on the top joint - the one between A and G - is the C# trill key
- The hook on the right Ab key, if you have it, is for the G#-A trill - you hold down that hook and wiggle the G key. The hook holds the G key low to help the tuning on the trill
- The long thin key just above the E key is the D trill key
